Archive for May, 2009
Posted by Ramprasad Navaneethakrishnan on May 26, 2009
In my previous post I wrote about creating sites using sharepoint object model. I strongly recommend to read that post before proceeding with this. It discusses about Sharepoint Site Architectures in detail.
Listed below are the Sharepoint site components and their corresponding object in the sharepoint object model.
| Sharepoint Site Architecture Component |
Object in Sharepoint Object Model |
| Site Collection |
SPSite |
| Site |
SPWeb |
| List Collection |
SPListCollection |
| List |
SPList |
| List Field Collection |
SPFieldCollection |
| List Field |
SPField |
| List Item Collection |
SPListItemCollection |
| List Item |
SPListItem |
Steps to create a new Sharepoint List:
- Open Visual Studio. Create a new Windows Forms project.
- Add a textboxes, one to accept the name of the site collection and another to accept the name of the new site to be created under the site collection.
- Add a button that creates the new site.
- Add reference to Microsoft.Sharepoint dll. This dll is represented by the name Windows Sharepoint Services in the Add Reference dialog box.
- Add the namespace of Microsoft.Sharepoint dll like this.
- using Microsoft.Sharepoint;
- In the button click event, open the site collection.
- SPSite siteCollection = new SPSite(txtSiteCollectionUrl.Text);
- Now open the top level site of the site collection.
- SPWeb site = siteCollection.OpenWeb();
- If you want to open a different site under the site collection other than the top level site, you can use the overloaded methods of the OpenWeb() method that accepts the name of the site as argument.
- The Lists property present in the SPWeb object will return all the lists that are present in that site as an SPListCollection object
- SPListCollection listCollection = site.Lists;
- In order to add a new list, use the add method of the SPListCollection object.
- listCollection.Add(“listname”, “list description”, SPListTemplateType.GenericList);
- Note that the third argument accepts the template in which the list should be created. GenericTemplate represents the custom list. We can choose the template we need from the SPListTemplateType enum.
- Close and dispose and the site and site collection
The complete code can be found below..
using System;
using System.Collections.Generic;
using System.ComponentModel;
using System.Data;
using System.Drawing;
using System.Linq;
using System.Text;
using System.Windows.Forms;
using Microsoft.SharePoint;
namespace WindowsFormsApplication1
{
public partial class Form1 : Form
{
public Form1()
{
InitializeComponent();
}
SPSite siteCollection;
SPWeb site;
private void btnCreateSite_Click(object sender, EventArgs e)
{
try
{
siteCollection = new SPSite(txtSiteCollection.Text);
site = siteCollection.OpenWeb();
SPListCollection listCollection = site.Lists;
listCollection.Add(txtListName.Text, “list description”, SPListTemplateType.GenericList);
}
catch (Exception)
{ }
finally
{
site.Dispose();
siteCollection.Close();
}
}
}
}
Hope this is useful.
Posted in MOSS 2007 | Tagged: Creating Sharepoint Lists, Microsoft Office Sharepoint Server 2007, MOSS 2007, MOSS 2007 development, Sharepoint 2007, Sharepoint Object Model, Sharepoint programming, SPListCollection, SPLists, SPSite, SPWeb | 4 Comments »
Posted by Ramprasad Navaneethakrishnan on May 24, 2009
MOSS 2007 provides rich set of API’s that allows developers to programatically accomplish almost everything that can be done in sharepoint. Sharepoint Object Model comes with 10 different dll’s comprising 30 namespaces.
The aim of this post is to leverage the sharepoint object model in order to create a new sharepoint site programatically.
Before getting into that, lets look at the sharepoint site structure in the following diagram.
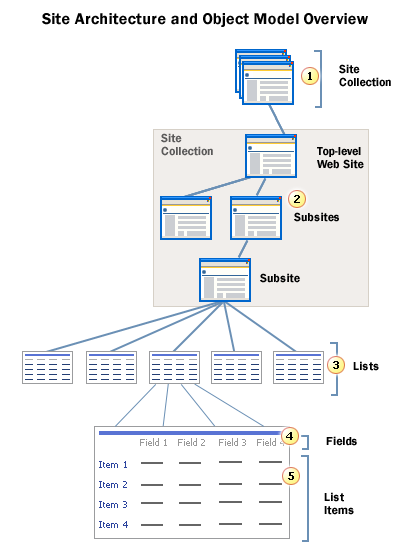
Each layer in the above architecture diagram is represented by an object in the sharepoint object model. The object mapping is represented in the following table.
| Sharepoint Site Architecture Component |
Object in Sharepoint Object Model |
| Site Collection |
SPSite |
| Site |
SPWeb |
| List Collection |
SPListCollection |
| List |
SPList |
| List Field Collection |
SPFieldCollection |
| List Field |
SPField |
| List Item Collection |
SPListItemCollection |
| List Item |
SPListItem |
Steps to create a new Sharepoint Site:
- Open Visual Studio. Create a new Windows Forms project.
- Add a textboxes, one to accept the name of the site collection and another to accept the name of the new site to be created under the site collection.
- Add a button that creates the new site.
- Add reference to Microsoft.Sharepoint dll. This dll is represented by the name Windows Sharepoint Services in the Add Reference dialog box.
- Add the namespace of Microsoft.Sharepoint dll like this.
- using Microsoft.Sharepoint;
- In the button click event, open the site collection.
- SPSite siteCollection = new SPSite(txtSiteCollectionUrl.Text);
- Now open the top level site of the site collection.
- SPWeb site = siteCollection.OpenWeb();
- If you want to open a different site under the site collection other than the top level site, you can use the overloaded methods of the OpenWeb() method that accepts the name of the site as argument.
- SPWeb object has a property called ‘Webs’ that contains a collection of all the sites present under that site.
- Inorder to add a new site, use the following code.
- site.Webs.Add(txtSiteName.Text, txtSiteName.Text, Convert.ToUInt32(1033),site.WebTemplate, , false,false);
- Close and dispose and the site and site collection
The complete code can be found in this file.using System;
using System.Collections.Generic;
using System.ComponentModel;
using System.Data;
using System.Drawing;
using System.Linq;
using System.Text;
using System.Windows.Forms;
using Microsoft.SharePoint;
namespace WindowsFormsApplication1
{
public partial class Form1 : Form
{
public Form1()
{
InitializeComponent();
}
SPSite siteCollection;
SPWeb site;
private void btnCreateSite_Click(object sender, EventArgs e)
{
try
{
siteCollection = new SPSite(txtSiteCollection.Text);
site = siteCollection.OpenWeb();
site.Webs.Add(txtSiteName.Text, txtSiteName.Text,
txtSiteName.Text + ” Desc”, Convert.ToUInt32(1033), site.WebTemplate,
false, false);
}
catch (Exception)
{ }
finally
{
site.Dispose();
siteCollection.Close();
}
}
}
}
Hope this is useful.
Thanks.
Posted in MOSS 2007 | Tagged: Create Site, MOSS 2007, Sharepoint 2007, Sharepoint Object Model, Site Collection, SPSite, SPWeb | 2 Comments »
Posted by Ramprasad Navaneethakrishnan on May 9, 2009
In my last post, I explained all the out-of-the-box templates availalble in Sharepoint 2007. In some cases (say a unique business requirement that needs a site template that doen’t fit in any of the one available out-of-the-box), the templates available out-of-the-box, cannot be utilized right away. We might want to create a template that is customized to a requirement.
MOSS 2007 lets us create a site that is customized to our requirement and allow as to save and use that site as a template. How? Read further..
Now, I want to create a site template that will have the following elements. To make it very simple, I am having just the following two elements.
- Document Library
- Picture Library
No available out-of-the-templates suites this requirement. Hence we build our own template
Creating Template Structure
- Go to Site Actions –> Create
- Select Site and Workspaces
- Give a title to the Site, enter the Url in the corresponding box.
- In the Select Templates, select Blank Template under the tab Collaboration
- Provide the administrator id and click Ok to create the Blank Site
- From the newly created Blank Site, go to Site Actions –> Create
- Selecte Document Library in the Libraries and Lists section.
- Give the name and decscription for the Docuemnt library and click Ok.
- Again goto Site Actions –> Create.
- Select Picture Libraries in the Libraries and Lists section.
- Enter the name and description for the Picture library. Click Ok.
Now we have created the structure for our template. The next step is creating a Template from this structure
Creating Template
- Go to Site Actions –> Site Settings
- Select Save as a Template from the section ‘ Look and Feel ‘.
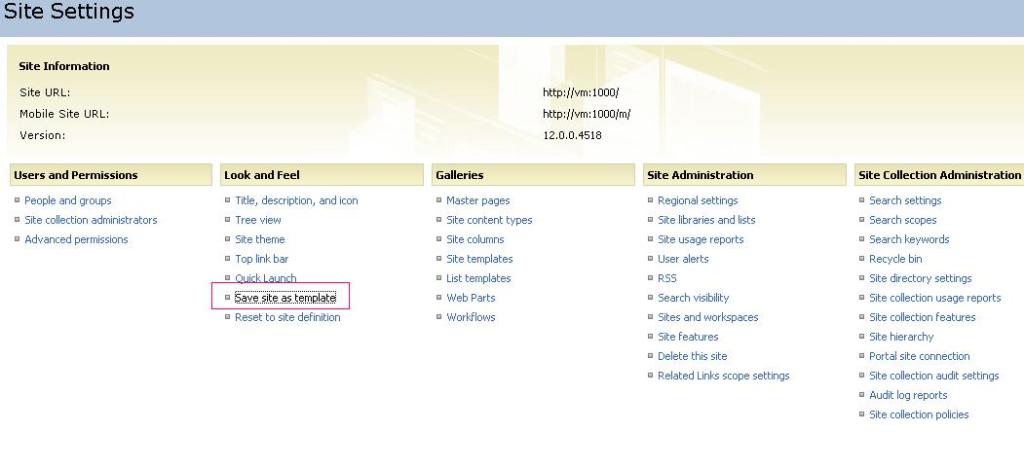

- Enter the name for the template and the template file name. I am giving the name of ‘TrainingTemplate’ for both template and the filename.
- Note the template file is has an extension of .stp.
- Give a short description for the template.
- Click Ok to create the template.
Once the template is created, it will be available in the Site templte gallery as shown below.
Now lets create a site based on the template we just created.
- Go to Site Actions –> Create
- Select Sites and Workspaces.
- Now you can see a Customtab in the templates section as shown below
- Select the Custom tab. This will show the template ‘TrainingTemplate’ we just created.
- Select the template, fill other required details like primary site administrator. Click Ok.
- Now the created site will have Document libraries and Picture libraries by default as shown below.
Hope this is useful.
Thanks.
Posted in MOSS 2007 | Tagged: Create Custom Templates, Custom Sharepoint Templates, Custom Templates, Miscrosoft Office Sharepoint Server 2007, MOSS 2007, Save Site as a Template, Sharepoint, Sharepoint 2007, Sharepoint Templates, Site Templates | Leave a Comment »
Posted by Ramprasad Navaneethakrishnan on May 9, 2009
Over my previous posts, I was discussing about the out-of-the-box site templates and out-of-the-box webparts available in MOSS 2007. This post is dedicated to Creating Custom Web Parts in MOSS 2007.
Creating Custom Web Parts:
Let us list down the procedures involved in creating custom web parts.
- Create custom web part control in Visual Studio
- Strong name the created web part assembly
- Place the assembly in the bin directory in the Virtual Directory of the web application
- Place the assembly in the GAC
- Notedown the assembly name, version and public key token by looking into the assembly properties in the GAC
- Add a SafeControl entry for the web part assembly in the application’s web.config file
- Do IISRESET
- Create Web Part in Visual Studio
- Open Visual Studio 2005–>Create New Project–>Select Class Library project template–>Enter the project name as CustomWebpart
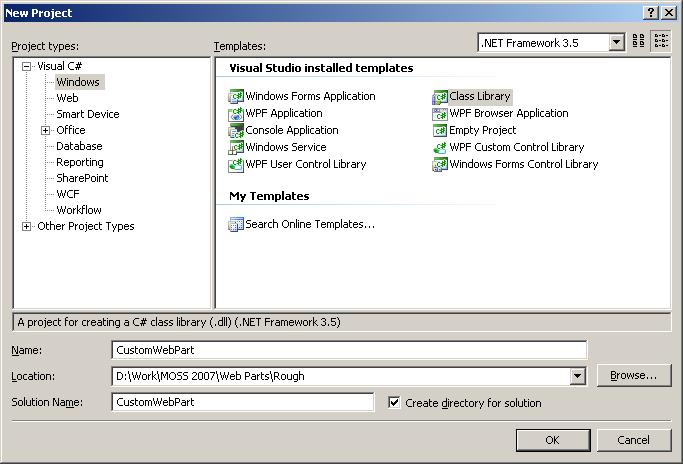
- Add Reference to System.Web dll
- Open Class1.cs. Add the following namespaces
- using System.Web;
- using System.Web.UI.WebControls;
- using System.Web.UI.WebControls.WebParts;
- Change the name of the class to CustomWebPart1. Inherit CustomWebPart1 from WebPart class (see code below)
- Override CreateChildControls and RenderControls events (see code below)
- Create a label control and assign its text property inside CreateChildControls events ( see code below)
- The code looks like the following
using System;
using System.Collections.Generic;
using System.Linq;
using System.Text;
using System.Web;
using System.Web.UI.WebControls;
using System.Web.UI.WebControls.WebParts;
namespace CustomWebpart
{
public class CustomWebPart1 : WebPart
{
Label lblName;
protected override void CreateChildControls()
{
lblName = new Label();
lblName.Text = “This is the Custom Webpart created in MOSS training”;
this.Controls.Add(lblName);
base.CreateChildControls();
}
public override void RenderControl(System.Web.UI.HtmlTextWriter writer)
{
base.RenderControl(writer);
}
}
}
- Build the solution. The assembly CustomWebpart will get created
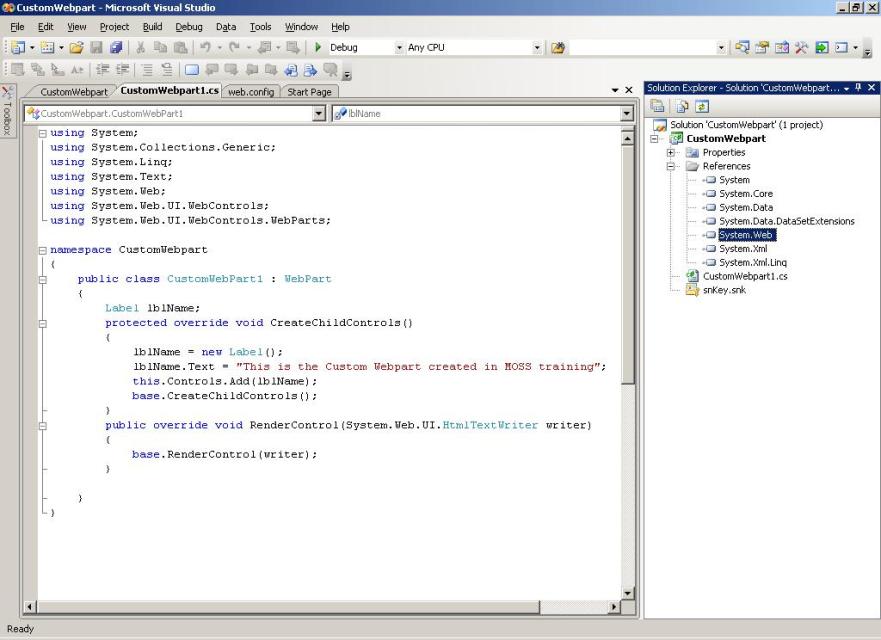
- Strong Naming the Assembly
- Go to Project Properties page (Right click the project and select properties)
- Select Signings section. Check the ‘Sign the assembly’ checkbox.
- Select ‘Create New’ in the ‘Choose the strong name file’ drop down box.
- In the dilog box enter a key name say snKey and click ok. (Uncheck the password checkbox).
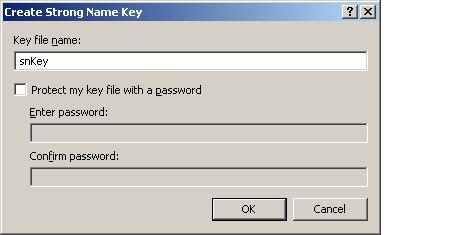
- Now the assembly is strong named. Build the project.
- Place the dll in the bin folder of the application’s virtual directory
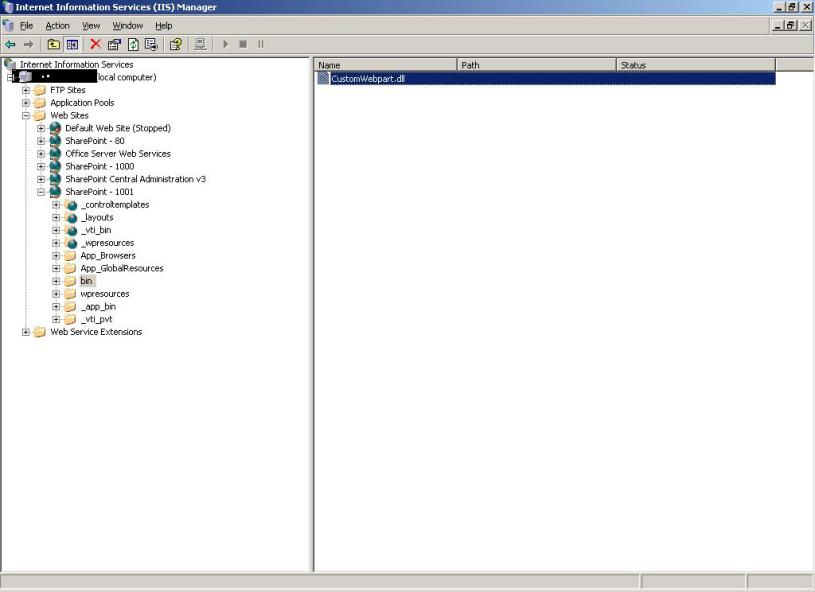
- Place the dll in the GAC and note down its name and public key token
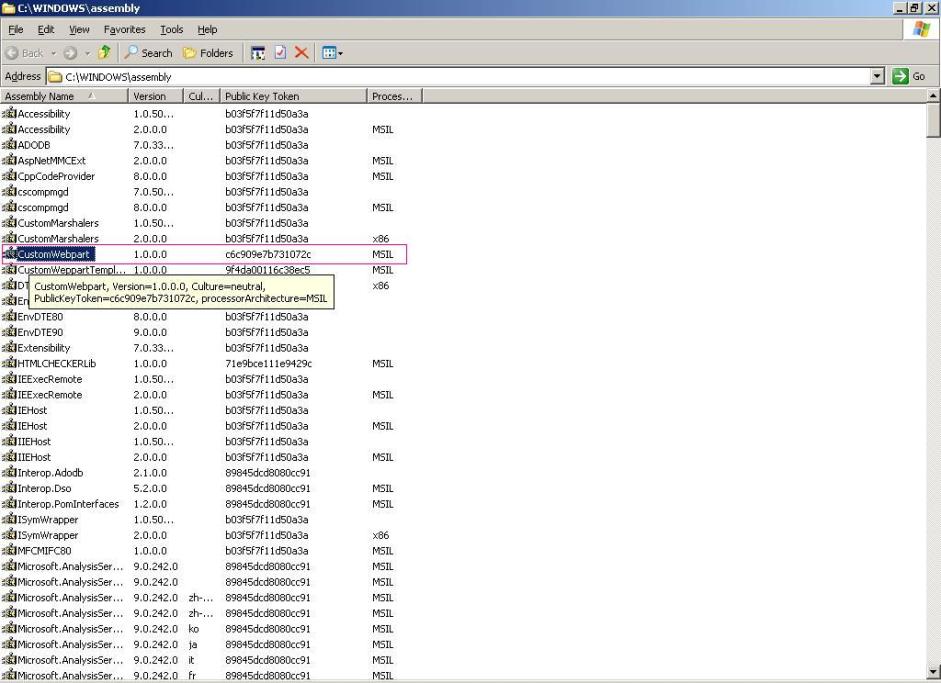
- Add the assembly as Safe Control in the application’s web.config.

- Thats all. Do an IISRESET
- Adding newly created web part to Site Collection
- Go to SiteActions –>Site Settings
- In the Galleries section choose Web Parts
- In the Web Parts gallery click on New
- In Add new web parts page, scroll through the list and select the web part you just created.
- Click on the button Import Web Part to the Gallery.
- Now, go to the page where you want to add the newly created custom web part
- SiteActions –> Edit page
- Click Add Web Part. In the Add Web Part box, select the custom web part.
- Click Ok.
- Now you can see the custom web part is added to the page.
Hope this is useful.
Please leave your comments.
Thanks
Posted in MOSS 2007 | Tagged: Add New Web Part, Class Library, Custom Web Parts, IIS, IISRESET, MOSS 2007, Safe Control, Sharepoint 2, Visual Studio, Web Part Gallery, Web Parts | 8 Comments »
Posted by Ramprasad Navaneethakrishnan on May 9, 2009
This post discusses about Form Web Part which is an out-of-the-box web part available with MOSS 2007. Other out-of-the-box MOSS 2007 webparts are discussed here.
Form Web Part unlike other web parts does not operate alone. Usually this web part is used to provide input to other web parts / lists to act accordingly. For example,
- Form web part can pass the url / path of an image that is to be displayed in the Picture web part.
- Form web part can pass the value of the filter to be applied to a column in the sharepoint list.
Let us take one of the examples and discuss in detail.
There is a sharepoint list with the name ‘EmployeeDetails’ with the following columns. Name, Title, Email and Department. The lists looks something like this

The requirement is, we want to dynamically apply the filter on the Department column. ie, we might want to see employees belonging to department ‘HR’ at one time and employees beloging to department ‘Sales’ another time.
For this, lets Add a Form Web Part to the page.
- Go to Site Actions –> Edit Page
- Click Add a Web Part
- Select Form Web Part from the list of web parts displayed
- By default, Form web part contains a textbox and a ‘Go’ button.
- Variety of controls like Labels, check boxes etc can be added to the Form Web Part using the Source Editor present in the tool pane.( A web part’s tool pane can be accessed byclicking Modify Shared Web Part option present in the Edit menu of that web part). For simplicity, lets make use of the default controls available with the Form web part. Now the page looks something like this

- Now in the Form Web Part, go to Edit –> Connections –> Provide values to –> Select ‘EmployeeDetails’. This will open ‘Configure Connection’ dialog box.

- Select Column T1 and click next (Note T1 is the name of the textbox in the form web part which you can see from the Source Editor of Form Web Part)
- Now a second dialog box appears that lists the columns present in the ‘EmployeeDetails’ list. Select the column for which we need to apply the filter. In our case it is ‘Deparment’ column

- Click Next or Finish to complete the configuration
- Now to list employee belonging to the department ‘HR’, enter ‘HR’ in the textbox of form web part and click Go. You can see the filtered EmployeeDetailas as below

- To get employees belong to Sales department, enter ‘Salee’ in the Form Web Part to get the needed list like below.

Hope this is useful..
Please leave your comments.
Thanks.
Posted in MOSS 2007 | Tagged: Column Filter, Connected Web Parts, Form Web Parts, MOSS 2007, Sharepoint 2007, Web Parts | 11 Comments »
Posted by Ramprasad Navaneethakrishnan on May 9, 2009
Web part is what that makes up the web pages in a sharepoint site. A Sharepoint site is nothing but a group of web pages in which each and every web page holds one or more web parts which in itself contains different types of data based on the type of the web part chosen. The following are the out-of-the-box web parts available with MOSS 2007.
- Content Editor Web Part
- Form Web Part
- Image Web Part
- List Web Part
- Page Viewer Web Part
- Site Users Web Part
- XML Web Part
Lets see each of these web parts in detail.
- Content Editor Web Part
- Content Editor Web Part is used to display data in the form of text, images, table and links. To provide input to this web part, it exposes three properties in its tool pane (A web part’s tool pane can be reached by Site Actions –> Edit Page –>Click Edit in the web part–>Select Modify Shared Web Part ). Those are
- Source Editor : Data is entered in HTML format. The data can be formatted using HTML tags and it requires author to know the HTML syntax.
- Rich Text Editor : Allows to enter information in plain text. It provides tools to insert images, tables and links into the web part.
- Content Link : This can be used to link this web part to a text file with HTML formatting.
- Form Web Part
- Form Web Part needed a separate post and it can be read here.
- Image Web Part
- This Web Part is used to add an image to your web part page. The image can be a drawing or a logo or a diagram. The supported image formats are .bmp, .emf, .gif, .jpg, .png
- The path of the image can be given in the Image Link property in the web parts tool pane
- Page Viewer Web Part
- This web part displays the content of any web page that is linked to it. In addition to web pages, it can display the contents of a folder or a file for which the path is provided in the toolpane.
- There will be three radio buttons in the toolpane for each for Web Page, Folders and Files. The appropriate radio button should be checked and in the Link textbox, the path of the webpage, file or folder should be provided.
- Site Users Web Part
- This web part displays the list of users and groups who have access to the Sharepoint site. There are three two filter conditions that can be applied to customize the users / groups being displayed.
- Number Of Items To Display : Restricts the number of items (users / groups) being displayed in this web part. The value ranges from 1 to 1000.
- Display Type:
- Display Users / Groups who have direct permission.
- Display user’s belonging to this Site’s members group
- Display users from this group . ( The needed group name can be entered in the text box provided)
- XML Web Part
- This web part displays XML formatted data and applied XSL Transformtions prior to the display of the data.
- XML Editor and XSL editor properties present in the tool pane allows the user to enter the XML data and XSL transformations.
- XML Link and XSL Link properties present in the tool pane allows the user to link to XML files and XSLT files present anywhere in the connected network.
Hope this is useful.
There is also a post on out-of-the-box site templates in MOSS 2007 here.
Thanks.
Posted in MOSS 2007 | Tagged: Content Editor Web Part, Form Web Part, Image Web Part, Microsoft Office Sharepoint Server 2007, Page Viewer Web Part, Sharepoint, Sharepoint Web Parts, Site Users Web Part, Web Parts, XML Web Part | 2 Comments »
Posted by Ramprasad Navaneethakrishnan on May 9, 2009
On my previous posts, I wrote about Out-of-the-box Site templates and Creating custom templates
This post is on ‘Changing the Site Theme’ in a Sharepoint site.
- Goto Site Actions –> Site Settings
- Under the Look and Feel sections, select Site themes. The page will be shown like below.
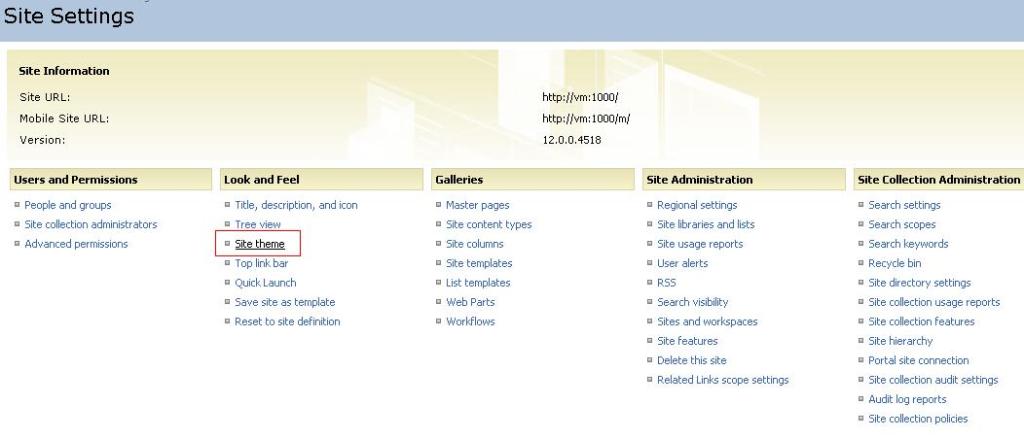
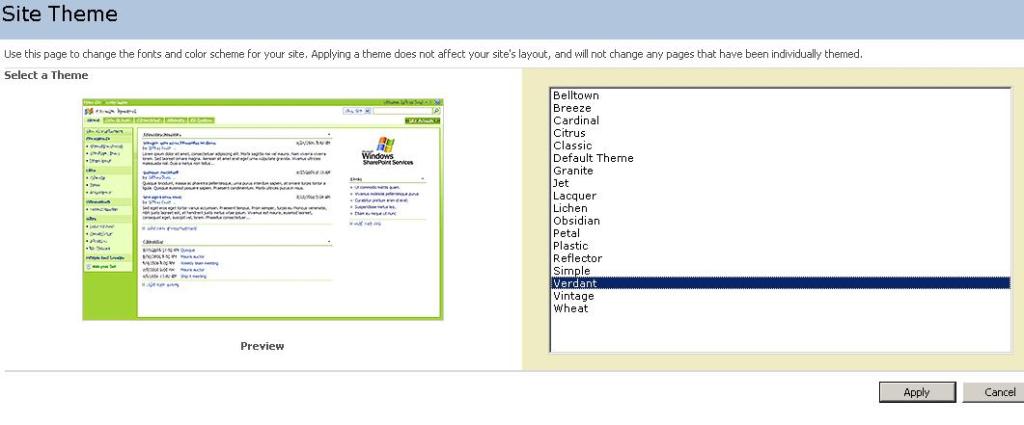
3. On selecting various themes available in the list, a preview of the selected theme is shown on the left side.
4. Select the desired theme and select Ok to apply the theme
Posted in MOSS 2007 | Tagged: Microsoft Office Sharepoint Server 2007, Sharepoint, Sharepoint 2007, Sharepoint Site Themes, Site Themes | Leave a Comment »
Posted by Ramprasad Navaneethakrishnan on May 9, 2009
Sharepoint 2007 comes with some out-of-the-box site templates that allows Administrators or Information Workers to readily create sites by choosing one of the available templates that suites their requirement.
The out-of-the-box Site Templates available with Sharepoint 2007 are broadly classified into 4 categories as mentioned below.
- Collaboration
- Meeting
- Enterprise
- Publishing
Collaboration Templates
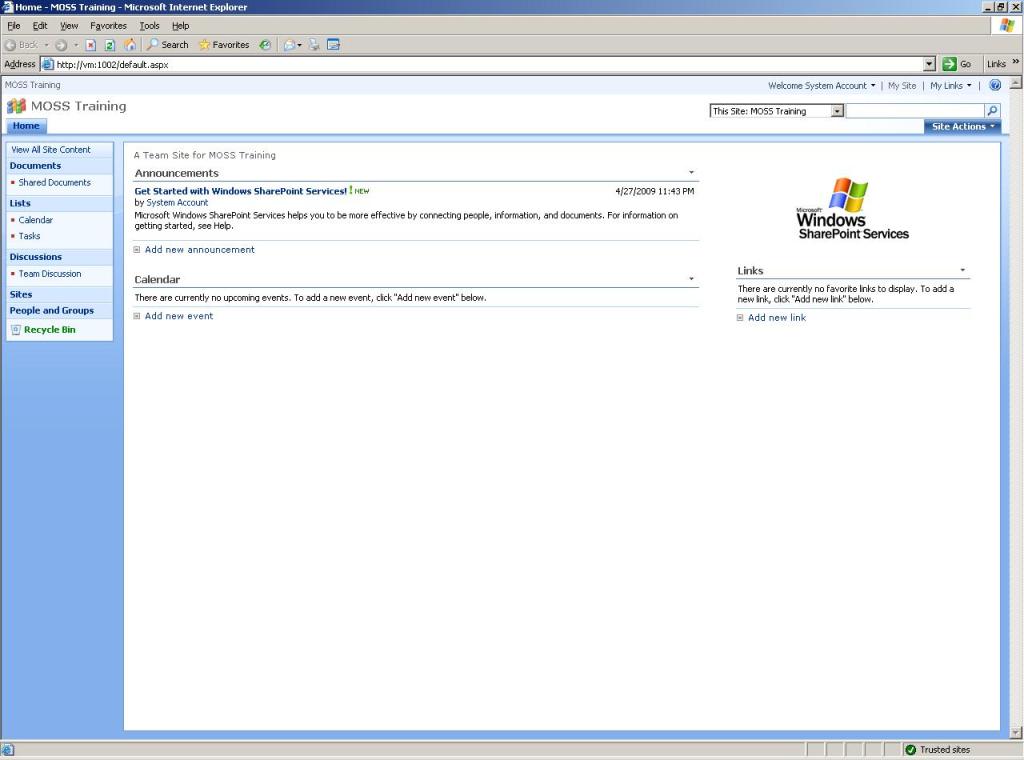
- Team Site:
- This site is for team members to collaborate on any tasks or projects. To facilitate this type of collaboration, it includes the following webparts
- Document library : To manage documents associated with the task / project
- Announcement List : Create / Manage announcements with the project team
- Discussion Board : A forum to discuss on tasks / issues assocaited with the project
- Calendar Lists : Keeps track of the various schedules associated with team members / project
- Task Lists : A list that keeps track of task items assigned against members of the project
- Links : A single place to keep track of links to sites that are needed for the project
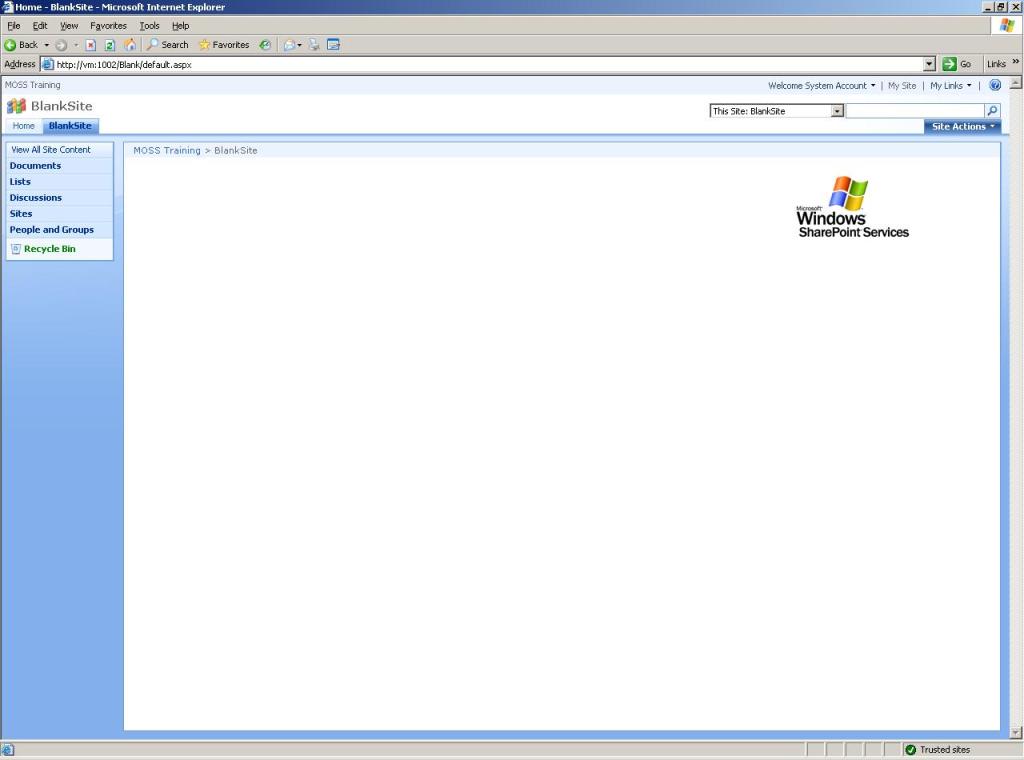
- Blank Site:
- As the name suggests, its just a blank site with no webparts populated by default. This is a good place for building a fully customized site.
Document Workspace:
- This template is suitable for a team documentation project or a team of technical writers where there is a need in creation and modification of common documentation.
- It has the following webparts associated with it.
- Document Library
- Tasks List
- Links

- Blog Site:
- A site for a team or person to post ideas and observations which site visitors can comment to.
Meeting Templates
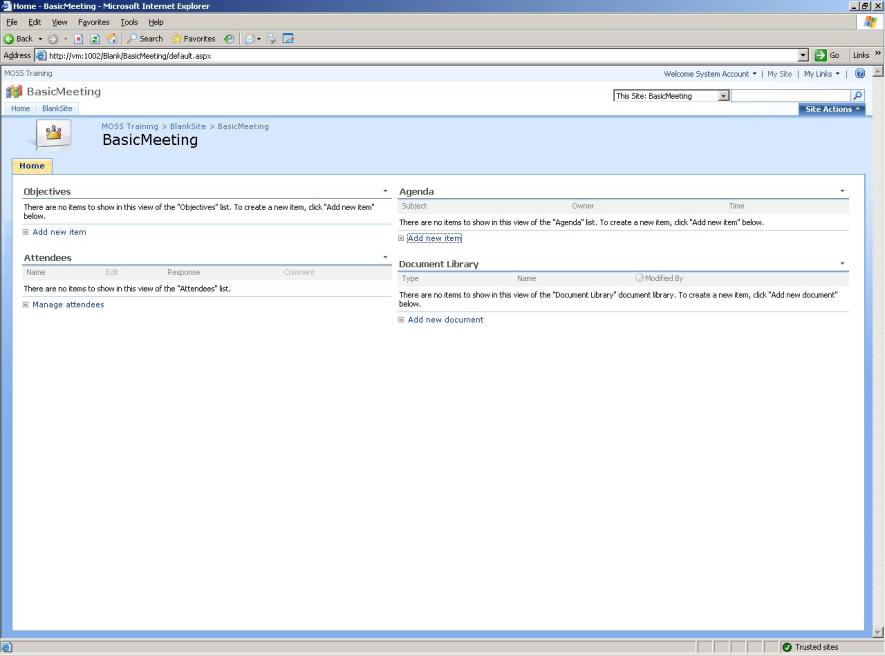
Basic Meeting:
- A general purpose meeting template that helps to plan, organize and capture the results of the meeting using the following webparts associated with the site
- Objectives list
- Attendies
- Agenda
- Document Library
- Blank Meeting:
- A blank meeting site that can be customized to suite the requirement
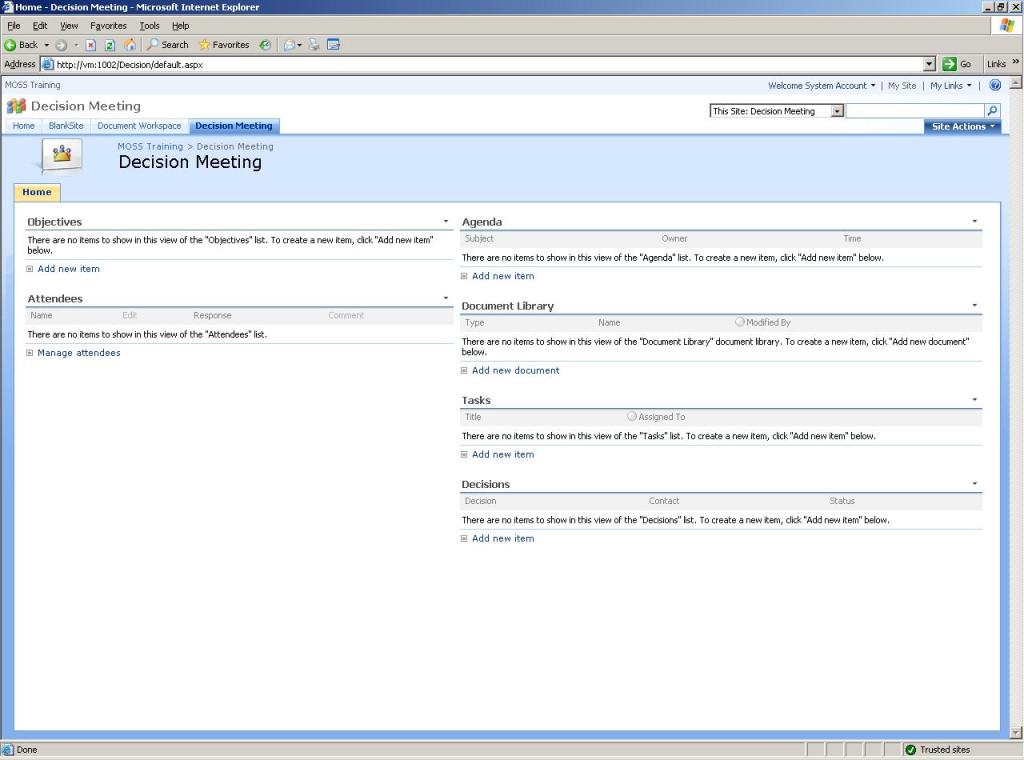
- Decision Making Meeting:
- This template is suitable when the purpose of the meeting is to reivew doucments, lists and other informations in order to make a decision. The webparts included are
- Objectives list
- Attendies
- Agenda
- Document Library
- Tasks List
- Decision List
- Social Meeting:
- This template comes handy when organizing a team picnic or party. The web elements included are
- Attendies list
- Directions
- Image Log
- Thing to bring List
- Photo Library
- MultiPage Meeting:
- This is similar to Decision Making template but it is designed to accomodate complex decision process. This site comes with two webpages by default and it can accomodate upto 10 individual pages. It includes
- Objective Lists
- Attendies Lists
- Agenda
Enterprise
Enterprise templates are normally used as a top-level or high-level sites in an organizations site collection. It facilitated enterprise level activities in the areas of document management, records management and report management
- Document Center:
- A Site to centrally manage enterprise level documents. It has several document management features enabled by default like Major / Minor versionaing, Require check out etc. This templates includes the following webparts.
- Document Library
- Relevant documents
- Upcoming tasks
- Treeview webpart
- Records Center:
- This site template is used to centrally manage organizations data and data sources. The webparts included are
- Records vault
- Records routing list
- Information management policy
- Unassigned Records library

- Site Directory:
- A site template for listing, categorizing important sites in the organizations site collection. The webparts included are
- Categorized Sites
- Top Sites
- Site Map
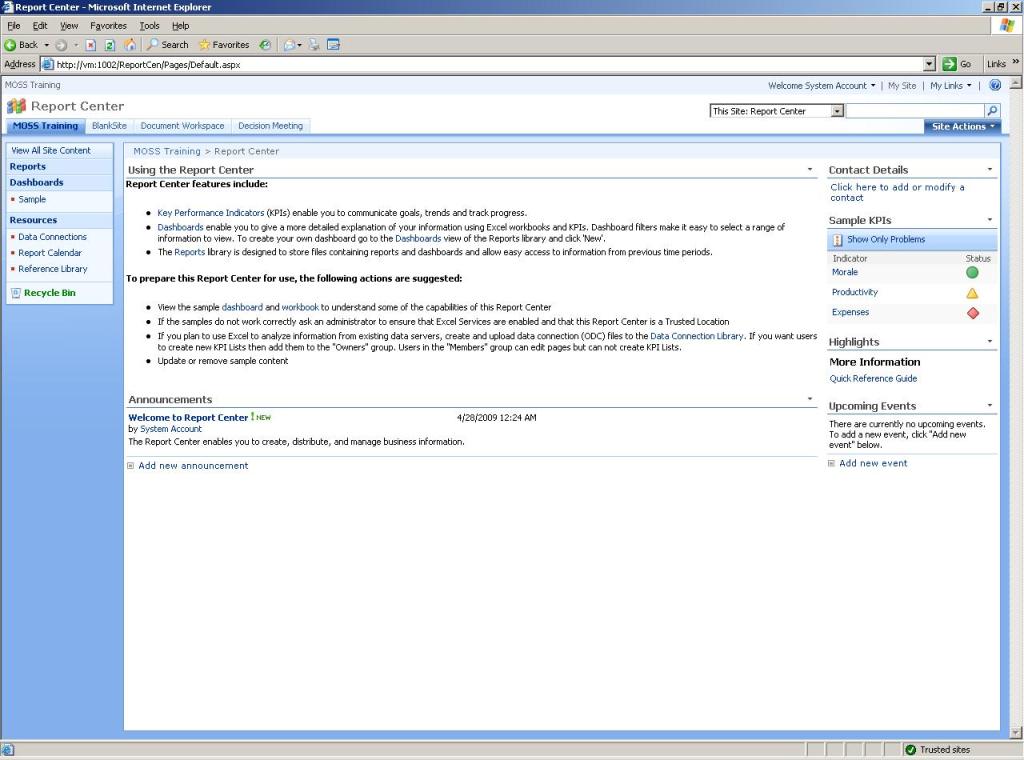
- Report Center:
- This site template as part of Sharepoint business intelligence solution communicates metrics, goals, statues and business intelligence informations by means of the foll0wing web elements
- Dashboards
- KPI indicators
- Webpages
- Search Center:
- A site that enables users to seach for information. It includes webparts
- SearchResults
- Advanced Search
- Search Center with tabs:
- This is similar to search center except it comes with two tabs. One tab to search through information in the sites and the other tab ‘people’ that enables to search through peoples.
Publishing
- News Site:
- A site for publising news articles and links to news articles. The default webparts includes
- Sample news page
- Archive for storing older news
Hope this is useful.
A post on creating custom templates can be found here
Thanks.
Posted in MOSS 2007 | Tagged: Blog, Collaboration Template, Document Center, Enterprise template, Introductio to Sharepoint Site Template, Meeting Template, Microsoft Office Sharepoint Server 2007, MOSS, MOSS 2007, Record Center, Report Center, Sharepoint 2007, Sharepoint Site Template, Sharepoint template, Site Template, Site Templates, Team Site, Wiki | 2 Comments »


